Light is the most important idea behind visual representation of anything that a human being can visually perceive. The idea of perception of light lies in the fact that what you can see isn't based on the objects that you are viewing but on the rays of light cast from a light source and reflected from those objects. It's important to note that your eyes don't directly see objects as there is no physical correlation between your eyes and those objects.
All of this is theoretical, of course. We use the term light rays to merely abstract a more complex mechanism.
Light rays commonly originate from an energy source such as the sun or a lamp in your room. It's important to note that theoretically a ray of light travels in a straight line and by the time you visually perceive an object, it is the rays of light reflected or scattered off that object that your eyes absorb.
The following terms describe different types of light that you must know when programming a 3D application which requires a light source. It is important to understand what effect each of these types of light create on the surface of rendered 3D objects. These terms were created because certain effects that light produces on the objects needed to be described in order to distill the complex mathematical calculations of light. However, this doesn't mean that these exact types of light actually exist in nature, we just think of them as an abstraction of the effects that light can produce when cast on different materials. It would be very time consuming to calculate the real mechanics of light and the way it works in nature so, this common set of light types was generally adopted by OpenGL: ambient light, diffuse light and specular light. Emissive light is differentiated from the rest, and is the type of light which is being emitted by an object, whereas the other three types of light are usually used to describe a light source. Let's take a detailed look at each of these types of light:

A 3D sphere lit by ambient light only appears to look 2D. Ambient light is the average volume of light that is created by emission of light from all of the light sources surrounding (or located inside of) the lit area. When sun rays pass through the window of a room they hit the walls and are reflected and scattered into all different directions which averagely brightens up the whole room. This visual quality is described by ambient light. Ambient light alone cannot communicate the complete representation of an object set in 3D space because all vertices are evenly lit by the same color and the object appears to be 2-dimensional as seen in the image above. Although the object displayed is actually a 3D sphere, it appears to be flat on the screen, when lit only by ambient light.
A diffuse light of red color is cast onto a black object defining its 3d shape.
Diffuse light represents a directional light cast by a light source. Diffuse light can be described as the light that has a position in space and comes from a single direction. A flashlight held slightly above the object lit by it can be thought of as emitting diffuse light. In the image above, a light source casting diffuse light of red color is located on the immediate left side of the object. When diffuse light touches the surface of an object, it scatters and reflects evenly across that surface.
To demonstrate how both ambient and diffuse lights work together to create a more-realistic looking object, imagine a 3D sphere with a dark red ambient light spread over it:
Now, by positioning a diffuse light source on the right side of the sphere, we get the following result:
Notice how the sphere now appears to be 3D.
Specular reflection (or specular highlight) is displayed here in addition to the ambient and diffuse layers of light. You can observe how the object's 3D representation is greatly augmented by specular light properties.
Just like diffuse light, specular light is a directional type of light. It comes from one particular direction. The difference between the two is that specular light reflects off the surface in a sharp and uniform way. The rendering of specular light relies on the angle between the viewer and the light source. From the viewer's standpoint specular light creates a highlighted area on the surface of the viewed object known as specular highlight or specular reflection. The intensity of the specular reflection is dependent on the material the object is made of and the strength of the light source which contains the specular light component.
Emissive light is a little different than any other previously explained light components. The emissive light component is responsible for the object's material's property to reflect or absorb light. When applied to an object's material, emissive light acts to simulate the light that is reflected off the object.
With no additional light sources around, an object's color to which only emissive light component is applied has the same visual quality as an object with only ambient light applied to it. However, the mechanics of how any additional diffuse or specular light reacts with the surface of the same object with only emissive light applied to it is different. Let's consider an object which emits an average amount of green color. On the image below emissive light component is applied to the sphere. And as you can see, the result is similar to the effect created by applying ambient light to the same sphere in the example above.
A 3D sphere reflecting green emissive light. The effect is similar to ambient light until additional sources of light are introduced into the scene.
As you already know, a light source can have all of the three components assigned to it which are the ambient light, the diffuse light and the specular light components. Let's see what happens when we apply a light source to the above scene. The light source we are applying has the following properties: red ambient light, red diffuse light and white specular light.
If the above sphere wasn't emitting a light of green color, it would have appeared red in color. However, a green component of emissive light is applied to it. When the light source's "rays" of light hit the sphere's surface, the "source" and "destination" colors merge together producing a yellowish surface. The specular light component of the light source is white. The center of the specular reflection is white in the center, however as it spreads off it merges with the green and red colors, augmenting on yellow (which is green + red). Again, note that if there were no emissive light applied to the sphere, it would have appeared like the sphere shown under the section specular light above, all in red with a white specular reflection.
The way OpenGL shades polygons to simulate light and how light properties are assigned to light sources and materials is explained in the following part of this tutorial.
In order to calculate the shading of a 3D object, CHAI3D needs to know the intensity, direction and color of the light that falls on it. These properties are provided by light objects in the world. The base color and intensity are set identically for all lights but the direction depends on which type of light you are using. Also, the light may diminish with distance from the source. The three types of lights available in CHAI3D are described below.
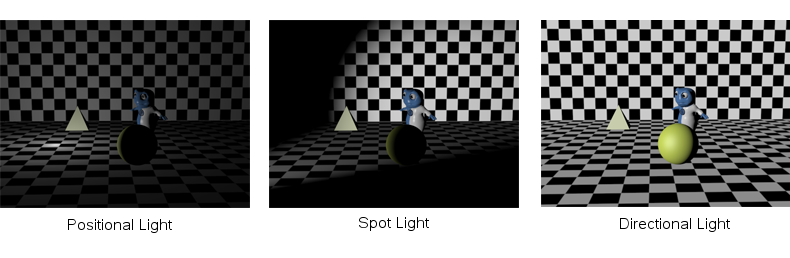
A Positional Light is located at a point in space and sends light out in all directions equally. The direction of light hitting a surface is the line from the point of contact back to the center of the light object. The intensity diminishes with distance from the light, reaching zero at a specified range. Point lights are useful for simulating lamps and other local sources of light in a scene.
A Directional Light does not have any identifiable source position and so the light object can be placed anywhere in the world. All objects in the world are illuminated as if the light is always from the same direction. The distance of the light from the target object is not defined and so the light does not diminish.
Directional lights represent large, distant sources that come from a position outside the range of the active workspace. In a realistic scene, they can be used to simulate the sun or moon. In an abstract simulation world, they can be a useful way to add convincing shading to objects without exactly specifying where the light is coming from. When checking an object in the scene view (to see how its mesh, shader and material look, for example) a directional light is often the quickest way to get an impression of how its shading will appear. For such a test, you are generally not interested in where the light is coming from but simply want to see the object look "solid" and look for glitches in the model.
Like a Positional light, a Spot Light has a specified location and range over which the light falls off. However, the spot light is constrained to a angle, resulting in a cone-shaped region of illumination. The center of the cone points in the backward (X) direction of the light object.
Spot lights are generally used for artificial light sources such as flashlights which can be attached to a haptics tool (e.g. to simulate an endoscope).

Shadow mapping or projective shadowing is a process by which shadows are added to 3D computer graphics. Shadows are created by testing whether a pixel is visible from the light source, by comparing it to a z-buffer or depth image of the light source's view, stored in the form of a texture.

If you looked out from a source of light, all of the objects you can see would appear in light. Anything behind those objects, however, would be in shadow. This is the basic principle used to create a shadow map. The light's view is rendered, storing the depth of every surface it sees (the shadow map). Next, the regular scene is rendered comparing the depth of every point drawn (as if it were being seen by the light, rather than the eye) to this depth map.
In CHAI3D, shadow maps are supported for spot lights. In the following example we illustrate how to setup a shadow map.
In order to maximize the quality of the shadow, it is important de assign the smallest cut-off angle possible. Furthermore the quality of the shadow map can be adjusted by increasing the resolution of the shadow map. Larger shadow maps obviously take a longer time to render and may not be supported on low performance graphic cards.
When rendering the camera scene, it is important to first update all shadow maps. If the scene is rendered using multiple camera and multiple framebuffers (window displays), then the shadow maps only need to be computed once.

